This document describes how to install and use your AMARI LTE NW and AMARI NW Series as well as AMARI LTE UE and AMARI UE Series software binary licenses. It explains basic install procedure and where to find software. For advanced use, please refer to software documentations.
The AMARI LTE NW and AMARI NW Series products include the following components:
lteenb: This component is a LTE base station or a LTE/NR base station depending on your license type.
ltemme: This component is an EPC or an EPC/5GC core network depending on your license type.
lteims: This component is an IMS test server.
ltembmsgw: This component is a LTE MBMS Gateway.
trx_<name>: This component is your radio frontend driver where <name> represents your radio frontend type. Examples are trx_sdr for PCIe SDR card and trx_uhd for USRP SDR cards.
www: this component is in charge of web interface to Amarisoft LTE software. It allows you to control the software and visualize logs.
The AMARI LTE UE and AMARI UE Series products include the following components:
lteue: This component is a LTE or LTE/NR UE simulator depending on your license type. It simulates one or more UEs by communicating through a RF system with a base station and core network.
trx_<name>: This component is your radio frontend driver where <name> represents your radio frontend type. Examples are trx_sdr for PCIe SDR card and trx_uhd for USRP SDR cards.
www: this component is in charge of web interface to Amarisoft LTE/NR software. It allows you to control the software and visualize logs.
Note that each component has a doc directory where you can find its documentation. Alternatively, all documentations are available for download in our Extranet.
Before proceeding, make sure that you have:
PCIe SDR50 card)
PCIe SDR100 card)
PCIe CPRI card)
USRP device such as N2x0
USRP device such as B2x0
USRP device such as X3x0
Your system requires at least GLIBC 2.17.
|
We strongly advise to restrict the usage of computer for running Amarisoft Software only. Installing or running any other program like graphical user interface can impact real performance of the device. |
Amarisoft provides a Fedora recovery image. This image can be used to setup your custom server with Fedora OS. You can find the details in tech academy at https://tech-academy.amarisoft.com/Install_RecoveryUSB.html.
The step by step manual install for Fedora is detailed in the follwoing. For other Linux distributions, you should find the the same packages to install.
dnf -y install openssh
systemctl enable sshd
nano /etc/ssh/sshd_config (Set PermitRootLogin yes)
service sshd start
service sshd status
systemctl disable firewalld
service firewalld stop
perl -p -i -e "s/enforcing/disabled/" /etc/selinux/config
systemctl enable multi-user.target --force
systemctl set-default multi-user.target
dnf -y install wget screen iperf wireshark lm_sensors make gcc lksctp-tools.x86_64 kernel-devel.x86_64 htop tcpdump perl php php-json
checksctp
service httpd status
systemctl enable httpd
service httpd start
Before starting the software installation of your Amarisoft setup, all Radio frontends have to be connected to your PC.
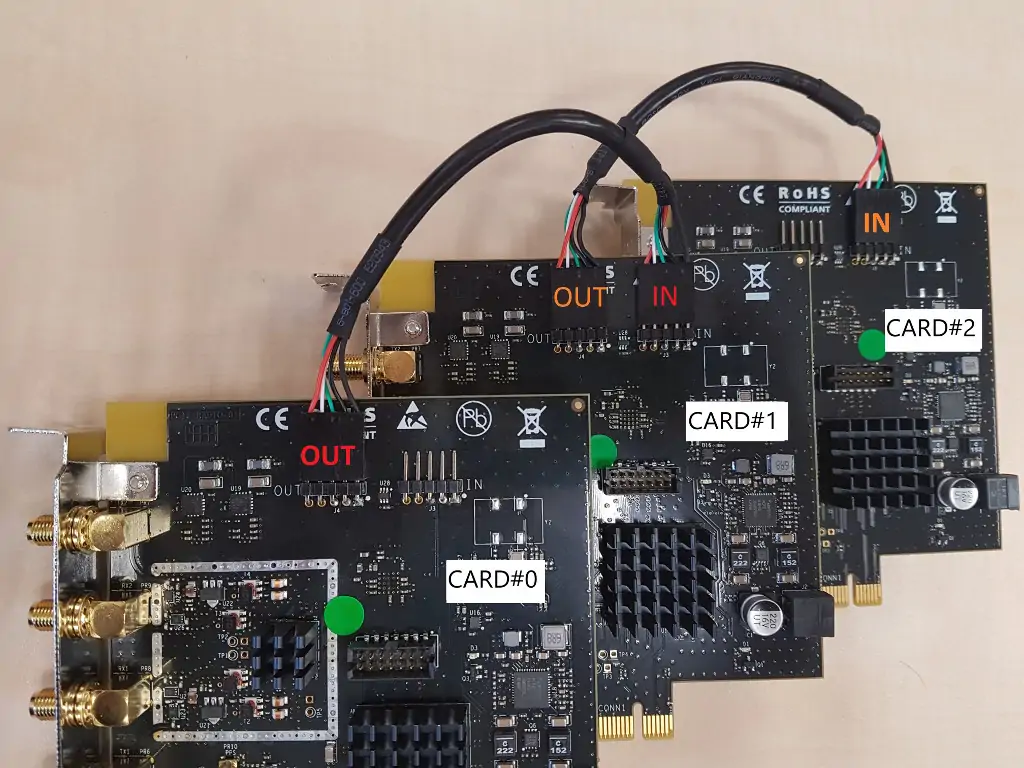
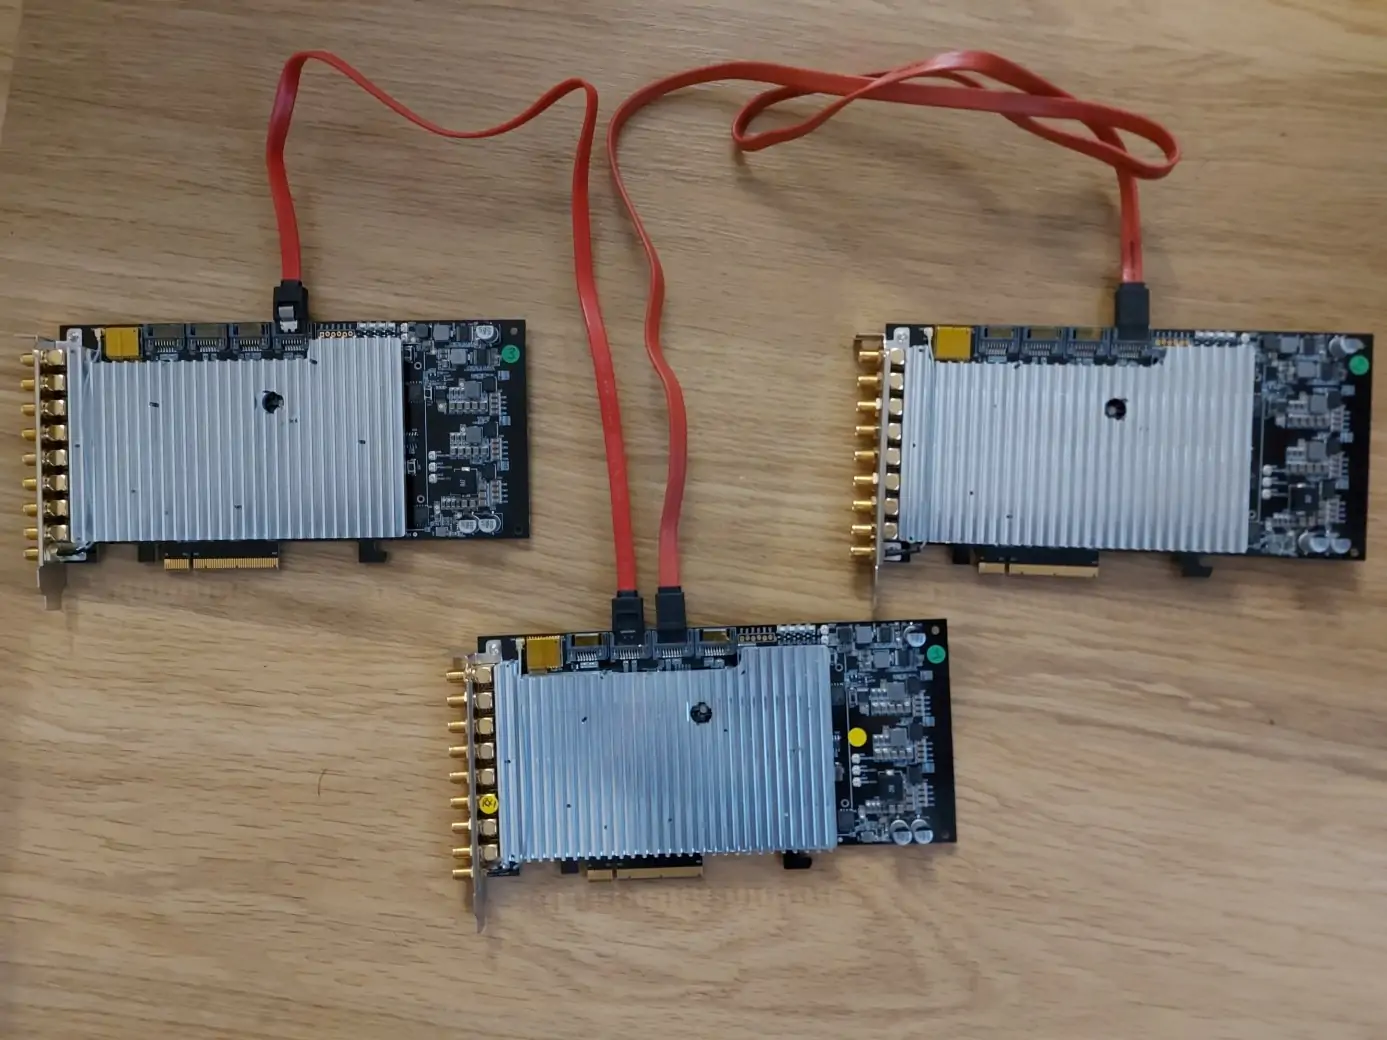
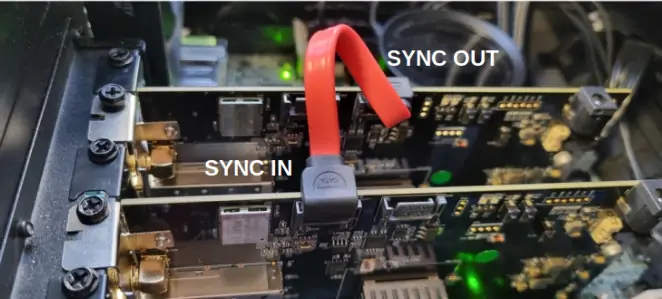
If your setup is composed of multiple Amarisoft PCIe cards, you need to plug the provided USB or SATA cables between each card in order to synchronize them in time and frequency as described hereunder.
PCIe SDR100 cards have 3 CLKOUT connectors to simply synchronize up to 4 boards while limiting delays caused by chaining
PCIe SDR100 cards as Master and connect one of the 3 SATA CLKOUT connector to the CLKIN connector of a Slave card
PCIe SDR100 cards to connect, use the CLKOUT connectors of one Slave card
sdr as your RF board. Board type is recognized automatically by the driver. To automatically install the software binary package on your PC, you need to follow these steps. Depending on your RF board, you will find a TRX driver in your package. The installation process will also update eNodeB configuration to use the corresponding TRX driver.
https://extranet.amarisoft.com/
tar xzf amarisoft.YYYY-MM-DD.tar.gz
This would create a directory called YYYY-MM-DD.
root, Go to the directory YYYY-MM-DD and execute the provided script install.sh as follows:
./install.sh <path> --default
<path> is specified, components are installed in /root, you can choose other directories by specifying a new destnation in <path>. Please note that www component will always be located under /var/www/html in Fedora or /var/www in Ubuntu.
--default option forces answer to default for all questions asked during install phase. The default answers for AMARI LTE NW and AMARI NW Series are depicted below:
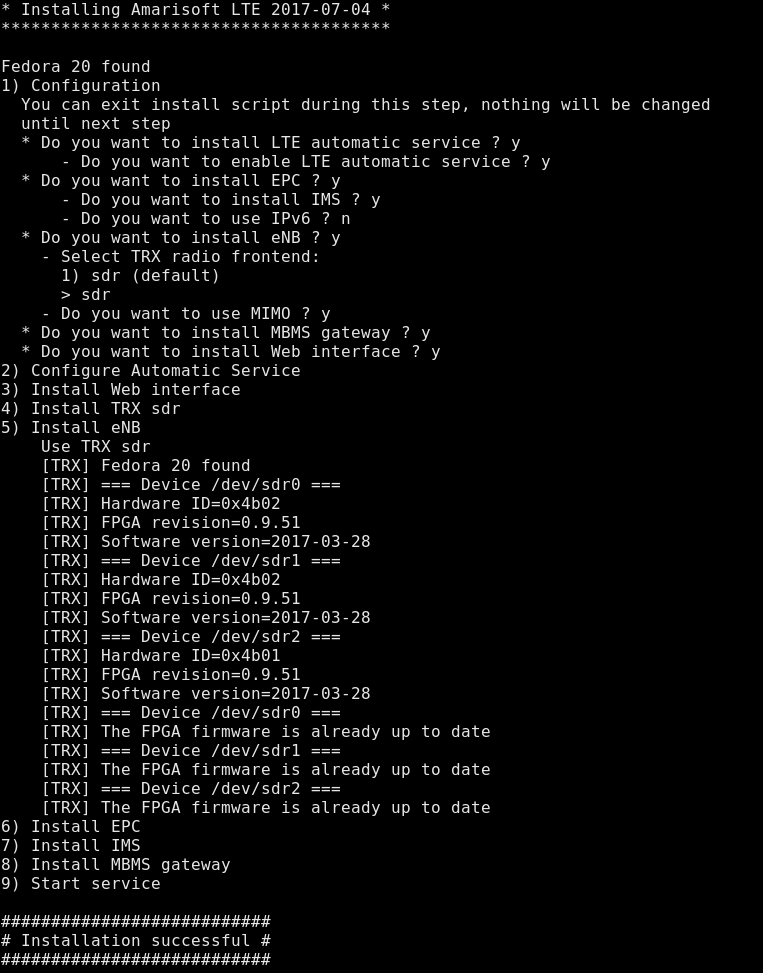
The default answers for AMARI LTE UE and AMARI UE Series are depicted below:
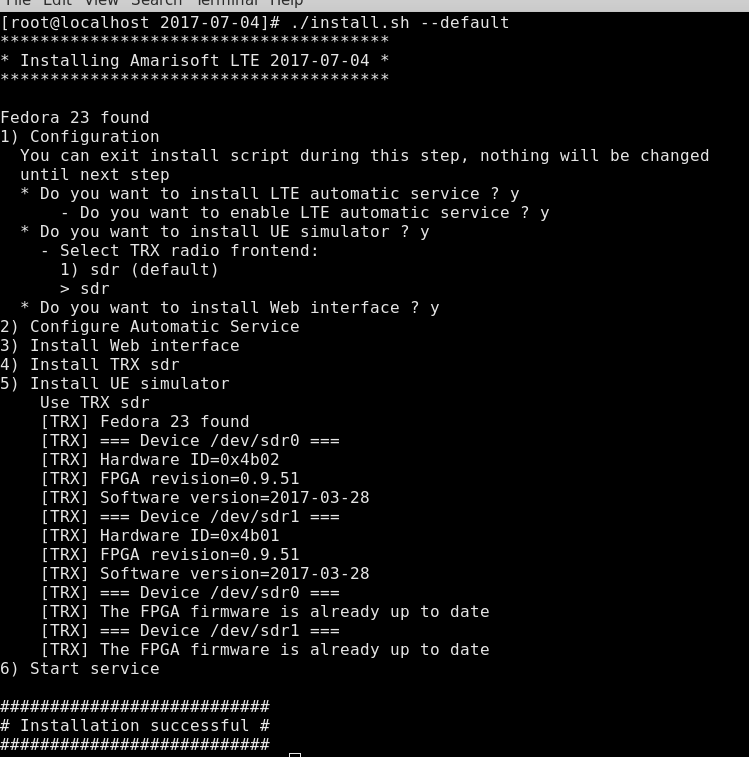
Take a look at messages at the end of install phase, you may be requested to power on/off your PC. This would be the case if there is, for example, an FPGA upgrade of your PCIe SDR card.
If you would like to have a custom install, you can run the script without --default option and answer each question separately. For AMARI LTE NW and AMARI NW Series product, this would typically be the case if you do not want to enable automatic LTE service or if you would like to install eNB and MME components on different PCs.
Once the installation phase is completed, you will need license files to use your system. Depending on the purchased license type, there are different ways to activate your system:
First thing is to start the software. If you have answered yes to the question Do you want to enable LTE automatic service?, then the software has already been started. In this case, you need to access LTE service screen to get your hexadecimal code. You can use the following command for this purpose:
screen -x lte
This will connect you to different component monitors. You should see a message stating that the license key is not present and printing a 16 digits hexadecimal code.
If you have not started LTE automatic service, then you need to start the software manually. The software package is located by default in /root unless you have specified another path when running install.sh script.
Below is the procedure to start all software components one by one assuming default path is used during the install:
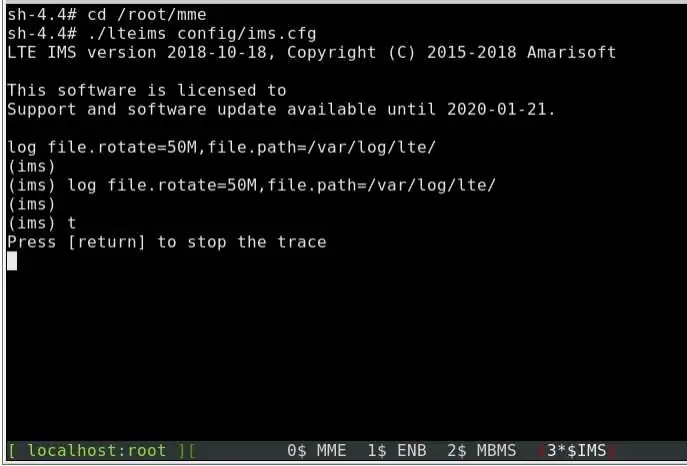
cd /root/mme
./ltemme config/mme.cfg
cd ../ims
./lteims config/ims.cfg
cd ../mbms
./ltembms
cd ../enb
./lteenb config/enb.cfg
Once the software is started, you will see the same hexadecimal code printed by each software component.
Please communicate to delivery@amarisoft.com the code to generate the license files
|
NOTE : The fixed license keys are deeply linked to Hardware where the hexadecimal code has been generated.
It’s by consequence not possible to move the license key on a new hardware or replace pieces such as the Network Interface Controller.
If you expect to replace your hardware, we recommend to use a floating license (see below), which is Hardware agnostic.
|
If you have answered yes to the question Do you want to enable LTE automatic service?, then the UE simulator has already been started. In this case, you need to access LTE service screen to get the code. You can use the following command for this purpose:
screen -x lte
This will connect you to the UE simulator monitor. You should see a message stating that the license key is not present and printing a 16 digits hexadecimal code.
If you have not started LTE automatic service, then you need to start the software manually. The UE simulator software is located by default in /root unless you have specified another path when running install.sh script. You can start it manually with following commands assuming default path is used during the install:
cd /root/ue
./lteue config/ue.cfg
Once the software started, you will see the hexadecimal code printed in the screen.
Next steps are:
delivery@amarisoft.com. License key files will be generated in Amarisoft Extranet. You will get an email when they are available for download.
delivery@amarisoft.com to request one.
${HOME} where ${HOME} is the home directory of the root user. (exemple /root/.amarisoft )
Once the license key files are installed, you need to restart the system.
First thing to do for using one or several floating licenses is to install a license server. This server can be run on one Amarisoft setup or on a dedicated PC.
If you use a dedicated PC , there is no Hardware requirement.
Just make sure that this PC can be reachable from other PCs running eNodeB or EPC and that you have :
Your system requires at least GLIBC 2.17.
To configure your license server PC :
./ltelicense_server config/license.cfg
Once the license server is up and running, you can now configure the Amarisoft components (i.e eNB, MME etc.. ) so they can connect to the server and retrieve the floating license.
${HOME} where ${HOME} is the home directory of the root user. (example /root/.amarisoft )
Example :
{
    license_server: {
        server_addr: "192.168.1.1"
    }
}
When using a floating license in USB dongle, the only thing to do is to plug the USB key provided by Amarisoft on your PC and verify that it is mounted.
If the USB is not mounted automatically, you can do it manually by following the steps below:
As root , type "fdisk -l" once the USB dongle is plugged
You should see a new Device enumerated with name "/dev/sdxx"
example: /dev/sdb1 * 56 15974399 15974344 7.6G b W95 FAT32
mkdir <dir_name>
example: "mkdir /media/usb-drive"
mount <source=device_name> <directory>
example: "mount /dev/sdb1 /media/usb-drive"
The USB dongle should now be detected and amarisoft components should be able to get the license keys from the dongle
If your setup is composed of one Amarisoft PCIe card only or if you use different Radio frontend models you can skip this section.
Otherwise, please read it as you may have to configure the SDR configuration manually.
Each PCIe SDR50 card has a unique device number assigned when the kernel driver is started.
Each PCIe SDR100 card creates 2 sdr devices: the master (TX/RX1 and TX/RX2) is assigned an even number and the slave (TX/TX3 and TX/RX4) is assigned the following odd device number: sdr0 and sdr1 for example.
Each PCIe CPRI card has a unique device number assigned when the kernel driver is started.
When your setup is composed of several PCIe cards, the mapping between the PCIe connectors and the Linux devices is not predictable (but it should not change after each boot).
Ideally, the mapping should follow the PCIe slot position and should result in :
PCIe slot#0=>dev/sdr0
PCIe slot#1=>dev/sdr1
PCIe slot#2=>dev/sdr2
etc ..

Unfortunately, this is not always the case. As a consequence, the first time you boot your system, you have to identify the position of the SDR cards by following the steps below and force the "sdr mapping" in order to align the linux device names and their physical positions.
To do so:
Once you have identified all SDR card positions, you may have something similar to this (where SDR names are misaligned with their positions)
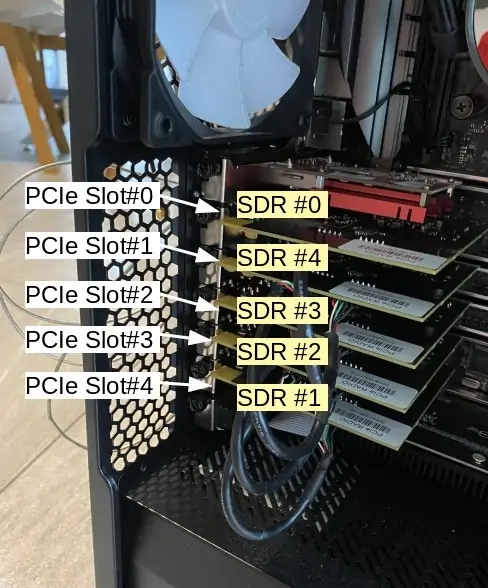
In that case, you need to force the sdr mapping by following the steps below :
After the power cycle, you can verify that SDR mapping is OK now by repeating the steps 1,2,3,4.
|
Note: This procedure must be run each time a SDR card is added or remove |
For more details , please refer to trx_sdr.pdf documentation
This section only applies to product with automatic LTE service.
The LTE automatic service uses /root/ots/config/ots.cfg for its configuration.
The format is shell.
The default configuration file is generated during installation.
To use your own configuration we recommend to create a new file and change /root/ots/config/ots.cfg
symbolic link to point to your file.
Else, your changes will be overriden at next software install/upgrade.
Example:
Create a my-ots.cfg file and put the following inside:
# Include default configuration
source ots.default.cfg

# Add your custom config
MME_CONFIG_FILE=/root/mme/config/my-mme.cfg
Then:
cd /root/ots/config
rm -f ots.cfg
ln -s my-ots.cfg ots.cfg
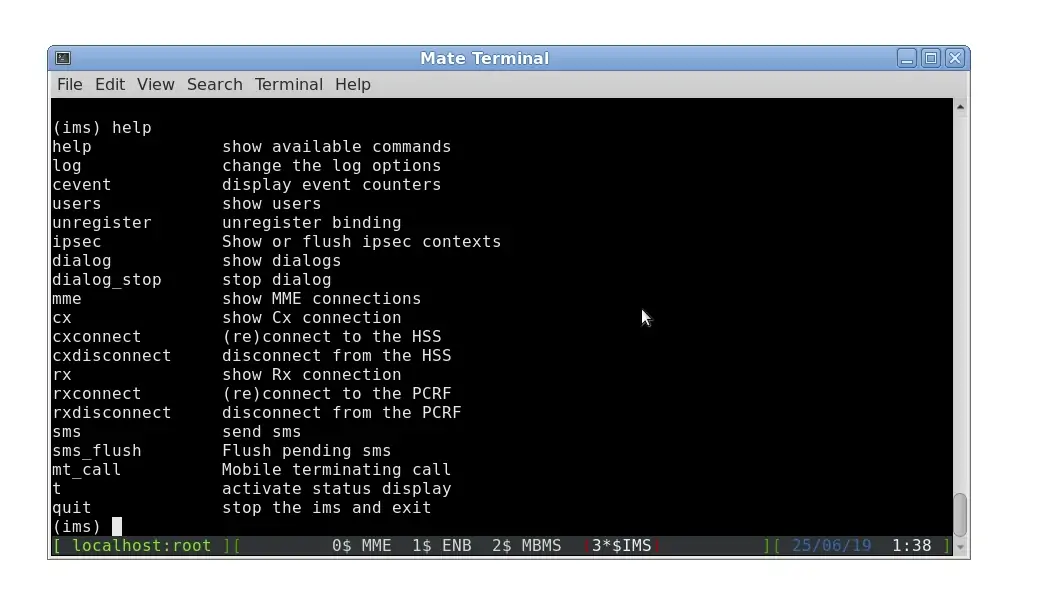
This section only applies to AMARI LTE NW and AMARI NW Series products with automatic LTE service. Once you are logged on your callbox, you can access software components (eNB, MME, IMS or MBMSGW) using screen command:
screen -x lte
This will connect you to different component monitor.
Next sections show you basic methods. For more information please refer to screen
documentation (https://www.gnu.org/software/screen/manual/screen.html).
Each component monitor is inside a window. You can switch from a window to another with the command:
ctrl+a <window index>
Where window index is:
|
Note: press simultaneously |
You can also switch to next window:
ctrl+a <space>
Each component screen offers a list of commands that can be used either to get status or trigger action. Each of them are documented in the component documentations (example lteenb.pdf) or inline with the "help" command
ctrl+a d
This section only applies to AMARI LTE UE and AMARI UE Series products with automatic LTE service.
Once you are logged in PC, you can access UE simultor using screen command:
screen -x lte
This will connect you to UE simulator monitor.
For more information please refer to screen documentation (https://www.gnu.org/software/screen/manual/screen.html).
ctrl+a d
This section applies to automatic LTE service for both AMARI LTE NW and AMARI NW Series and AMARI LTE UE and AMARI UE Series.
You can check the LTE service status this way:
service lte status
The command will return "active (running)" status if service is running
You can stop all LTE components this way:
service lte stop
You can start them again this way:
service lte start
You may also prevent them to start at boot time:
systemctl disable lte
NB: lte service remains enable until next reboot
NB2: this command is not available on Ubuntu version <= 14
You may enable service at boot time this way:
systemctl enable lte
NB: lte service remains disable until next reboot
NB2: this command is not available on Ubuntu version <= 14
This section only applies to AMARI LTE NW and AMARI NW Series with automatic LTE service.
The LTE automatic service starts each component with the following config files:
/root/enb/config/enb.cfg
/root/mme/config/mme.cfg
/root/mme/config/ims.cfg
/root/mbms/config/mbmsgw.cfg
Please note that these files are symbolic links to real configuration files as depicted below for enb.cfg.

In order to change the configuration, you have two options:
cd /root/enb/config
rm enb.cfg
ln -s enb-2cc.cfg enb.cfg
Once you have changed your config, you need to restart the LTE service using the following command:
service lte restart
NB: you may use screen to check that all components are correctly started.
For more details on config files, please refer to each component documentation.
This section only applies to AMARI LTE UE and AMARI UE Series with automatic LTE service.
The LTE automatic service starts UE Simulator with the following config:
/root/ue/config/ue.cfg
In order to change the configuration, you have to:
ue.cfg file to change the configuration.
service lte restart
For more details on config files, please refer to UE Simulator documentation.
All software components are installed in /root directory by default. You may find different versions of each component within the /root directory.
The systems uses symlinks (mme, enb, mbms, ue) that points to a version of each component as depicted below.

You can change those links if you need to change software version to use.
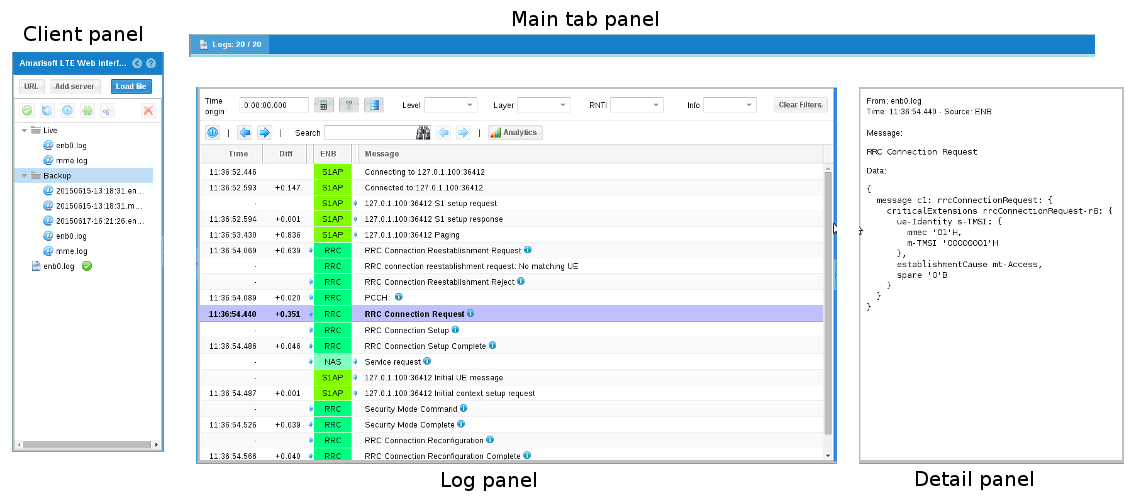
Components put their current logs in /tmp directory. However, you can also have access to a Web tool on the following URL that helps you visualize the logs as well as some useful stats for real time analysis.
To get access to this log , open a web browser (Chrome or Firefox) on you remote PC and connect to http://<my IP>/lte/ ,where my IP is the IP address of your PC where the Amarisoft software is running.
This will open a web page composed of three panels.
To display log and/or interact with Amarisoft software, you need to add a client (click Add server button as shown in picture below)
The list of your client is displayed on left panel of the interface.
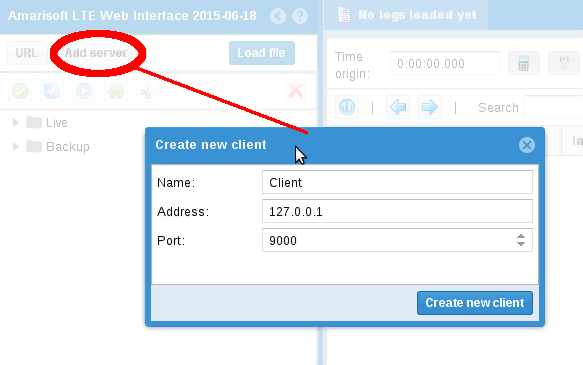
Enter name you want to appear on client panel, set the IP address of your component PC and the port of your software component.
*Note : each software component uses a specific port. To know this value, look at com_addr value in its configuration file (example ims.cfg).
Format is : com_addr: "<IP Address>:<Port Number>"
Where <IP Address> is the IP address of the WebSocket server remote API and <port Number> the port on which it listens. The WebSocket server for remote API will be enabled and bound to this address and port number.
The default values used in configuration files are:
in /root/mme/config/ims.cfg , com_addr: "[::]:9003"
in /root/mme/config/mme.cfg , com_addr: "[::]:9000"
in /root/enb/config/com_addr , com_addr: "[::]:9001"
Port 9003 is used for IMS , 9000 for MME and 9001 for eNB.
Note: [::] will make remote API reachable from any network interface.
After clicking on Create button, the client will try to connect.
If connection is successful, the configuration window will appear so that you configure logs:
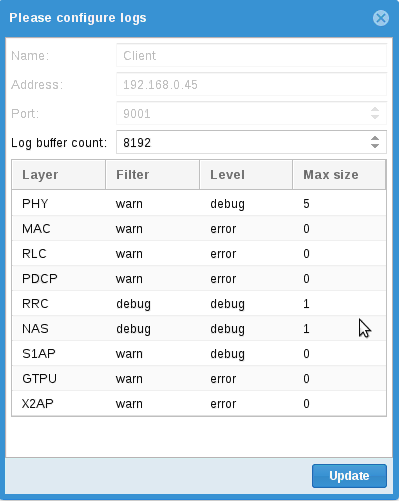
For each layer you can define a level of trace, from None to Debug (which gives the highest verbosity for the layer)
:
log_options
of its configuration file) and will override its configuration.log_options of its configuration file.
Of course, you can keep default configuration and simply click on Update.
The  icon means the client is not connected whereas
 means the client is connecting and
 means the client is connected.
When connected, a new tab will appear in main tab panel and provide you advanced features.
NOTE : If the client fails to connect and start logging , please check that HTTPD service ing on your component PC
service httpd status
For more details, please refer to ltewww documentation
Below are some of the most common issues encountered during install phase with recommended actions to address each issue.
| Issue | Cause/Correction |
|---|---|
Could not load ./trx_uhd.so' (Operation not supported) | Fedora 23 and Ubuntu 16 are using C++11 ABI and thus UHD driver is not compatible.
If you are in this case, please edit your RF config file and update name of RF driver part from uhd
to uhd_cxx11. |
trx_lms7002m.cpp:30:28: fatal error: lime/LimeSuite.h: No such file or directory | You need to first install LMS Suite available in URL https://wiki.myriadrf.org/Lime_Suite. |
TRX discontinuity too wide seen after running eNodeB | The most likely explanation is that not enough CPU time is available. Below is a check list:
|
| PC crashes or freezes during install phase or few seconds after running the SW | If you use PCIe card, below is a list to check:
|
Install script returns the following error message when using PCIe SDR card: insmod: ERROR: could not insert module sdr.ko: Invalid module format. | This error means that the driver module is not compatible with the kernel version of your PC. You should rebuild and reload the driver as below. Make sure you reboot the system.
cd /root/trx_sdr/kernel make clean make ./init.sh |
Install script returns the following error message when using PCIe SDR card: nsmod: ERROR: could not insert module sdr.ko: Required key not available. | This error comes from the Linux kernel because you are trying to load an unsigned SDR driver. It means that secure boot is activated. You should go to the BIOS settings and deactivate it.
|
license error when running Amarisoft software components: license /root/.amarisoft/ltexxx.key error 0xd. | This error is because the key file does not correspond to the software component which is being run. Typically, you will see this error when running ltemme software with lteenb.key as an example. |
license error when running Amarisoft software components: SSL error when loading license /root/.amarisoft/ltexxx.key. | This error could be casued either due to firewall or due to bad SSL libraries. In order to fix it:
|
extranet.amarisoft.com. This site would give you access to our documentation and new releases.
support.amarisoft.com. Please note that you need to have an active account in our Extranet in order to be able to login to our support site. Your credentials are the same as the ones you use to access Extranet.
ftp.amarisoft.com. This server should be used to exchange big logs. Your credentials are the same as the ones you use to access Extranet. Please note that you need to use an FTP client supporting SSL such as Filezilla.
delivery@amarisoft.com.
This document is copyright (C) 2012-2025 Amarisoft. Its redistribution without authorization is prohibited.
This document is available without any express or implied warranty and is subject to change without notice. In no event will Amarisoft be held liable for any damages arising from the use of this document.
For any technical issue, please raise a ticket from our support site at https://support.amarisoft.com/.
To learn more about our technology and solutions, e-mail us at customer@amarisoft.com or visit https://www.amarisoft.com.